When creating a sales funnel or any contact form, adding that little extra touch of personalization goes a long way! In this article, I’ll explain how to create a Thank You page that includes the user’s first name in the page content. Screenshots and code are pulled straight from my website here at Zealous Sites. :)
Mandatory disclaimer: Links in this article to Gravity Forms or Elegant Themes are affiliate links. This means that I will receive a small monetary compensation for sending you their way if you make a purchase of any of their products. This comes at no cost to you. :)
Why Do You Want A Personalized Thank You Page?
Why would you want to create a personalized thank you page? This seems like a lot of extra work for just adding the first name of someone who already is a lead. Why bother?
It’s Easy
Well for one, it’s not difficult to do when you have the right tools. Gravity Forms, Divi, and WordPress make this a super painless process. Just copy-paste the code below and follow along through the screenshots and you’ll be up and running in no time.
User Experience Is Important
Also, just because someone filled out your online form, doesn’t mean they’re ready to become a customer! If all they get is a small notification where the form used to be, it won’t feel very personal. And it doesn’t really give the user any next steps beyond leaving the website.
However, by adding this little bit of personalization it may be the difference between them leaving feeling “meh” or them leaving feeling “wow.” We want wow.
Analytics
Beyond those obvious, low-hanging fruit responses… there are also quantitative reasons for doing this. For one, you can track analytics better if there is a unique page that people only visit if they convert.
For Zealous Sites, we have a “contact us form” on every page of the website. Because of this, tracking someone’s process in the Sales Funnel is a bit tricky. But by having the Thank You page, we limit that funnel (using this term super loosely here) to potentially only being 2 steps: [Whatever Page They Submited] -> Thank You. With this data, we can see which pages converted the best and how we can improve other pages to do the same.
Get Started!
So before we begin, you’ll need to be sure to have the following resources.
- Gravity Forms
- The Shortcode Script Below
- Divi Theme
What Is Gravity Forms?
Gravity Forms is an incredible form builder tool by Rocket Genius. I have personally been using it for about a decade now and I have to say that it’s probably the second-best purchase I’ve ever made in my business. It has more than paid for itself hundreds of times over.
I wrote a whole article about Gravity Forms here if you’re interested!
(And here's a shameless ad for them because something needs to keep the lights on over here)


What’s Divi Again?
If Gravity Forms is my second-best purchase ever made for my business, Divi is the first.
If you’ve been reading this blog for very long, you probably already know what Divi is. But just in case you don’t, Divi is a framework for WordPress. It’s technically a theme, but I think calling it a theme is too limiting. Between its Theme Builder functionality, best-in-class front-end page builder, and compatibility with other major plugins; Divi stands far above its competitors.
If you don’t have an Elegant Themes license yet, you can pick one up here!

Let’s Begin!
I’ll go through each step in detail below, but the gist is:
Creating A Personalized Thank You Page
- Install Gravity Forms
Buy, download, and install Gravity Forms plugin onto your website. You can purchase a license from my affiliate link. :)
- Create Your Thank You Page
You can create a thank you page using any theme, but in this tutorial, we’ll be using Divi for its many other features.
- Configure Your Gravity Form Confirmation Settings
Beyond choosing a page to send the user to for confirmation that they have successfully submitted the form, you will also need to check and configure the “Pass Field Data via Query String” options.
- Extract The Query String From the URL via a Shortcode
We’ll be creating a shortcode that will grab the query string parameter from the permalink.
- Use Shortcode To Display Query String Parameter
Once that shortcode has been created in the functions.php file of your theme, you’ll add the actual shortcode to the thank you page we created in Step 2.
Create A Thank You Page
Before we can send the form to a Thank You page, we’ll need to first create that page. If you’ve already created a page and styled it accordingly, you can skip this step.
- In your WordPress dashboard, go to Pages > Add New
- Call it “Thank You” – or something along those lines.
- Style it as you please.
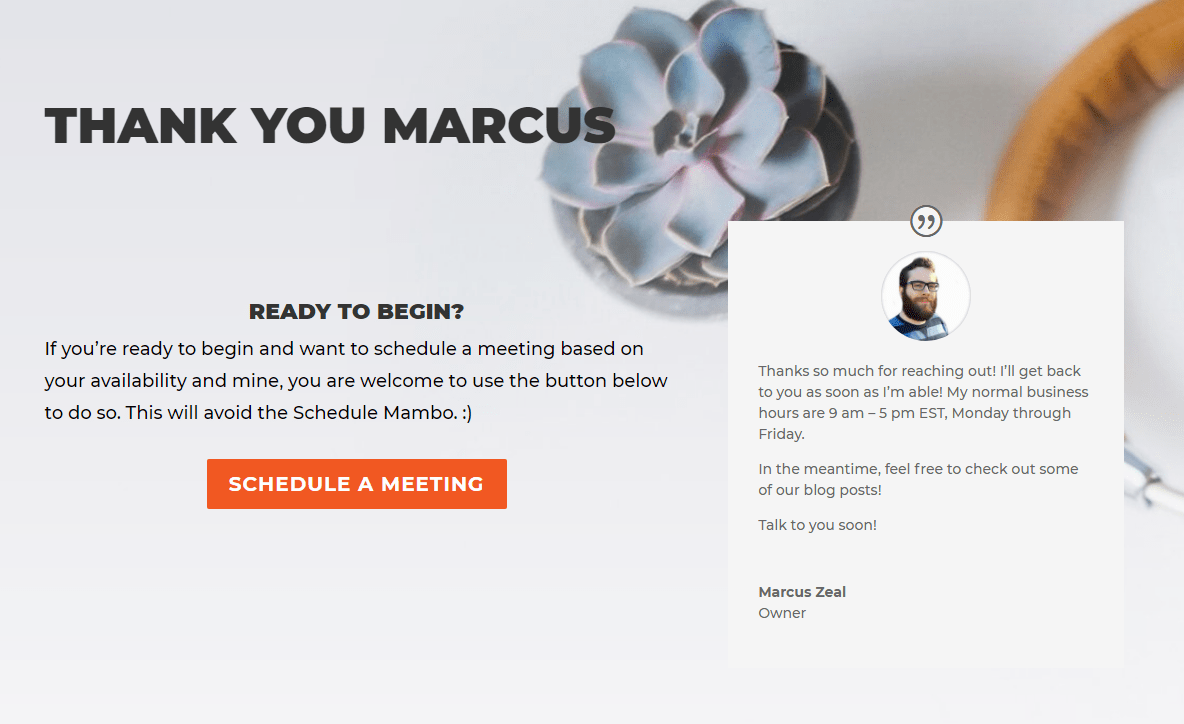
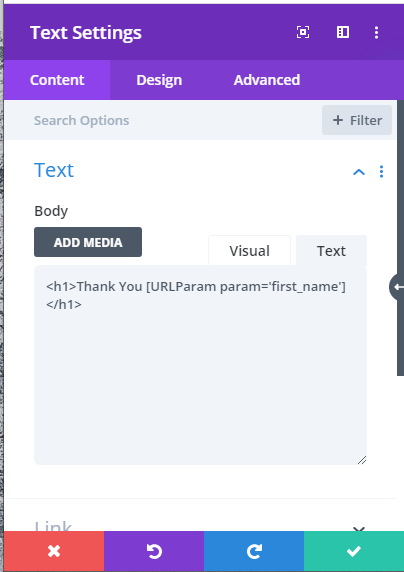
- Somewhere on this page you’ll want to include the submitter’s first name. For now, you can just leave that area blank, but we’ll be coming back to add a shortcode there later.
Gravity Forms Settings
After you’ve created a form, you can change the default Confirmation settings from Text to Page. By default, it will be set to text and will say something like “Thank you for reaching out! We’ll be in touch shortly!”, but by changing it to Page, it allows us to send the user to a new page after they’ve filled out the form.
In addition to giving us better analytical data for where the user is in our sales funnel, it also gives the user a much nicer experience.
- Navigate to Forms > Your Form > Settings > Confirmations.
- Tick “Page” in Confirmation Type.
- Choose your Thank You page from the drop-down
- Click “Pass Field Data via Query String“
- Type first_name= into the text area
- Click on the query string selector dropdown on the right
- Choose the First Name
- This will then populate the rest of the query string with the {ID(SubID):#.#} part of the field.
Now rather than being sent to /thank-you (or whatever your permalink is), your user will be sent to /thank-you/?first-name=fieldata! Everything after the “?” in the URL is called a Query String.
This by itself doesn’t mean a whole lot. But, by adding the ability to pull that data from the URL’s query string, we can create a pretty customized experience for that page.
Query String Parameter Script
To pull those query strings from the URL and then display them in the page, we’ll create a shortcode.
- Add the following code to your functions.php file.
- Be mindful of those opening and closing PHP tags. It’s unlikely that you’ll need to copy those.
<?php
/* Thank You Page Extract URL Param  */
function URLParam( $atts ) {
	if (isset($_GET['first_name'])) {
		extract( shortcode_atts( array(
			'param' => 'param',
		), $atts ) );
		return $_GET[$param];
	} else {
		//silence
	}
}
add_shortcode('URLParam', 'URLParam');
?>- Now you can use the following shortcode to retrieve the URL Parameter “first_name” and display it in the text. Be sure to remove the spaces from after the “[” and before the “]” or it won’t work.
[ URLParam param='first_name' ] Now that we have a way to retrieve that data, all we need to do is edit that Thank You page and test it!
Back To The Thank You Page!
Alright! Now that we have that shortcode created, we just need to go back to the Thank You page and add it in there!
- Navigate to the page you created earlier and click edit.
- If you’re using Divi, you’ll be able to just add the shortcode above into the text module and style it accordingly.
- Click save as you normally would
- Test your page!
To test your page, you’ll want to visit the page without any queries first. You want to be sure that it doesn’t break when there are no query strings. Because of this, I didn’t put any punctuation after or before the shortcode. “Thank you, !” would look a little odd, right?
Once you’ve tested the page without any query strings, fill out your form yourself and test the whole process!
That’s It!
That’s all there is to it! The process is pretty straightforward and painless! This personalized Thank You page should give your users the send-off they deserve and leave them excited to speak with you. That is, at least, the goal.
I hope this was helpful for somebody! If that somebody was you, feel free to leave a comment down below! If you think I should have covered something else in a bit more detail, or have a better snippet of code, feel free to leave that down below as well!
Lastly, if all this sounds like too much work for you and you’d rather just hire someone to do it for you, please consider Zealous Sites for your next website. :) We’d love to work together!